Archive for September, 2014
Preparing for the Harvest – Part II
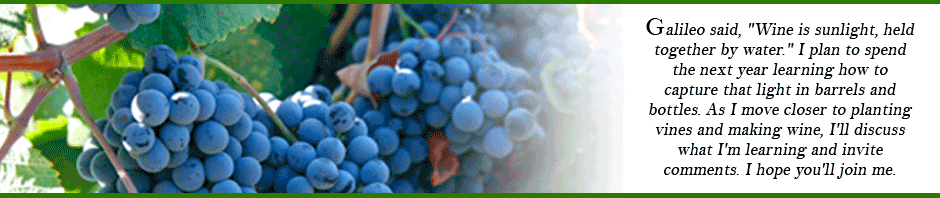
The bladder press is a lovely piece of equipment. below the juice channel, you can see the hook-up for the garden hose.
After three years and more of work and study, we’re close to our first harvest. We started in 2010 with our first classes on viticulture at Piedmont Virginia Community College, and moved on to researching and ordering vines in early 2011. We’ve spent three y ears nursing those vines along, and now some of the varieties – the Viognier especially – are only days away from being ready to pick. (With the rest a bit further behind.) And for all the time we’ve had to think about these things, found myself scrambling in these last few months to make sure I knew what I was doing and had the equipment to do it with.
In some ways, assembling the small items – the yeasts, the beakers, the malolactic bacteria and the like, which I discussed in my last post – was the easiest part of assembling a home winery. Those items mainly required research and an hour or so on the More Wine site. The big items – the crush-destemmer, the bladder press, and the barrel room – though few in number, posed the biggest challenge.
Because they were the most expensive items I ordered, I spent quite a bit of time agonizing over the crusher and press. There are lots of choices at very different price points, and I wanted to order equipment that would be adequate for the task without going overboard.
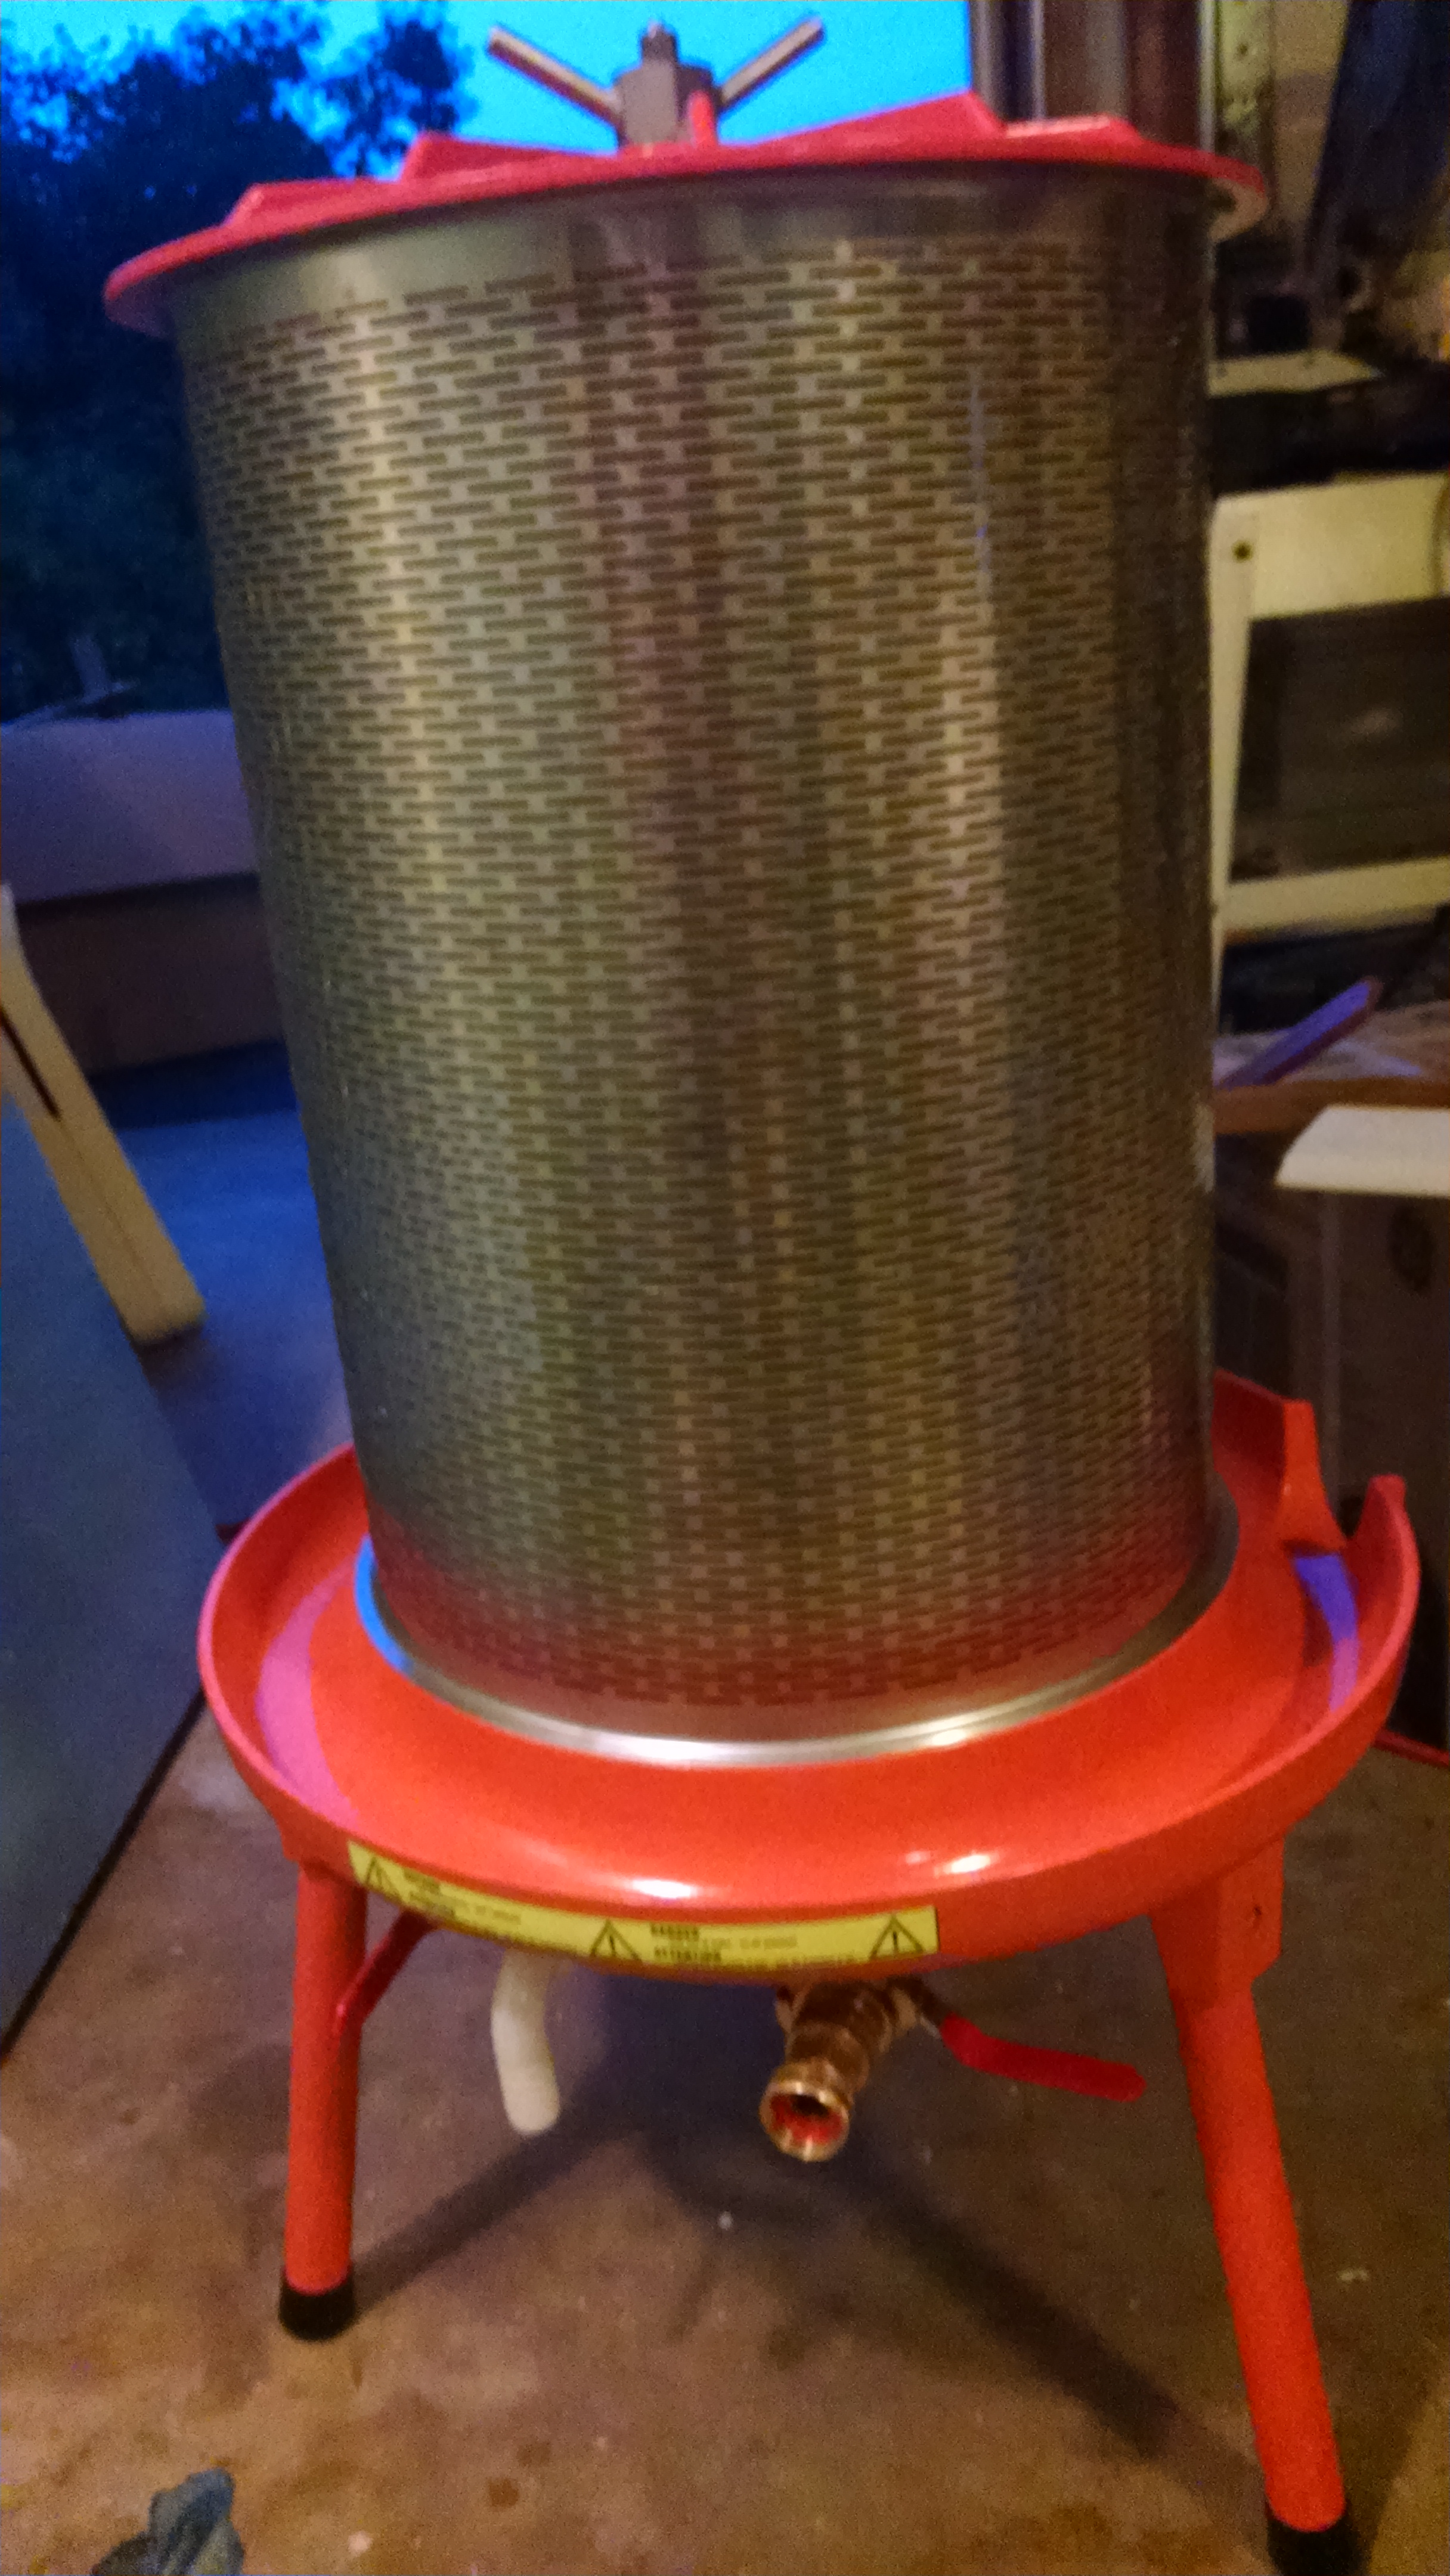
The crusher destemmer has two tasks. First, it gently crushes the grapes, so that, in the case of reds, they are ready to begin fermentation, and, in the case of whites, they are ready for the press. Second, it separates the stems (which contain bitter tannins) from the grapes. The stems fall out through one side of the crusher-destemmer into a bucket, and the grapes and juice fall into a fermenter.
Crusher-destemmr on its stand. I built the wood dolly with plywood, 2×4 lumber and 3 inch wheels.
I would have preferred that it work in the opposite order, first so that there’s no risk of the stems being crushed, and second, so that the two processes could be separated allowing me to destem without crushing if I chose to. But that’s a whole different price range, and all in all, I’m pretty happy with the motorized, stainless-steel machine I purchased. I did wonder briefly if it was overkill for the quantity of grapes I’m likely to be processing, but I tell myself that it’s an investment in the future. Yeah, that’s the ticket, an investment in the future!
I also ordered a bladder press, which is used to press the juice off the skins and seeds of the grapes. The bladder press is pricier than the more traditional-looking basket presses (think wood stave sides and a ratchet handle at the top that is turned to push down a plate to squeeze the grapes), but all of the literature I’ve read suggests the bladder press is a much better choice. The bladder inside the press fills with water from a garden hose to expand gently, pressing the grapes against a screen that lets the juice flow out, while the skins are kept inside. It’s actually quite a beautiful piece of hardware.
After I unpackaged the crusher-destemmer, admired it, let it sit on the shipping pallet for a couple of weeks (it’s really heavy), I came face to face with a small mistake. I hadn’t ordered a stand for it, reasoning that I could use sawhorses or something similar to hold it high enough to let the crushed grapes fall into a fermenter.
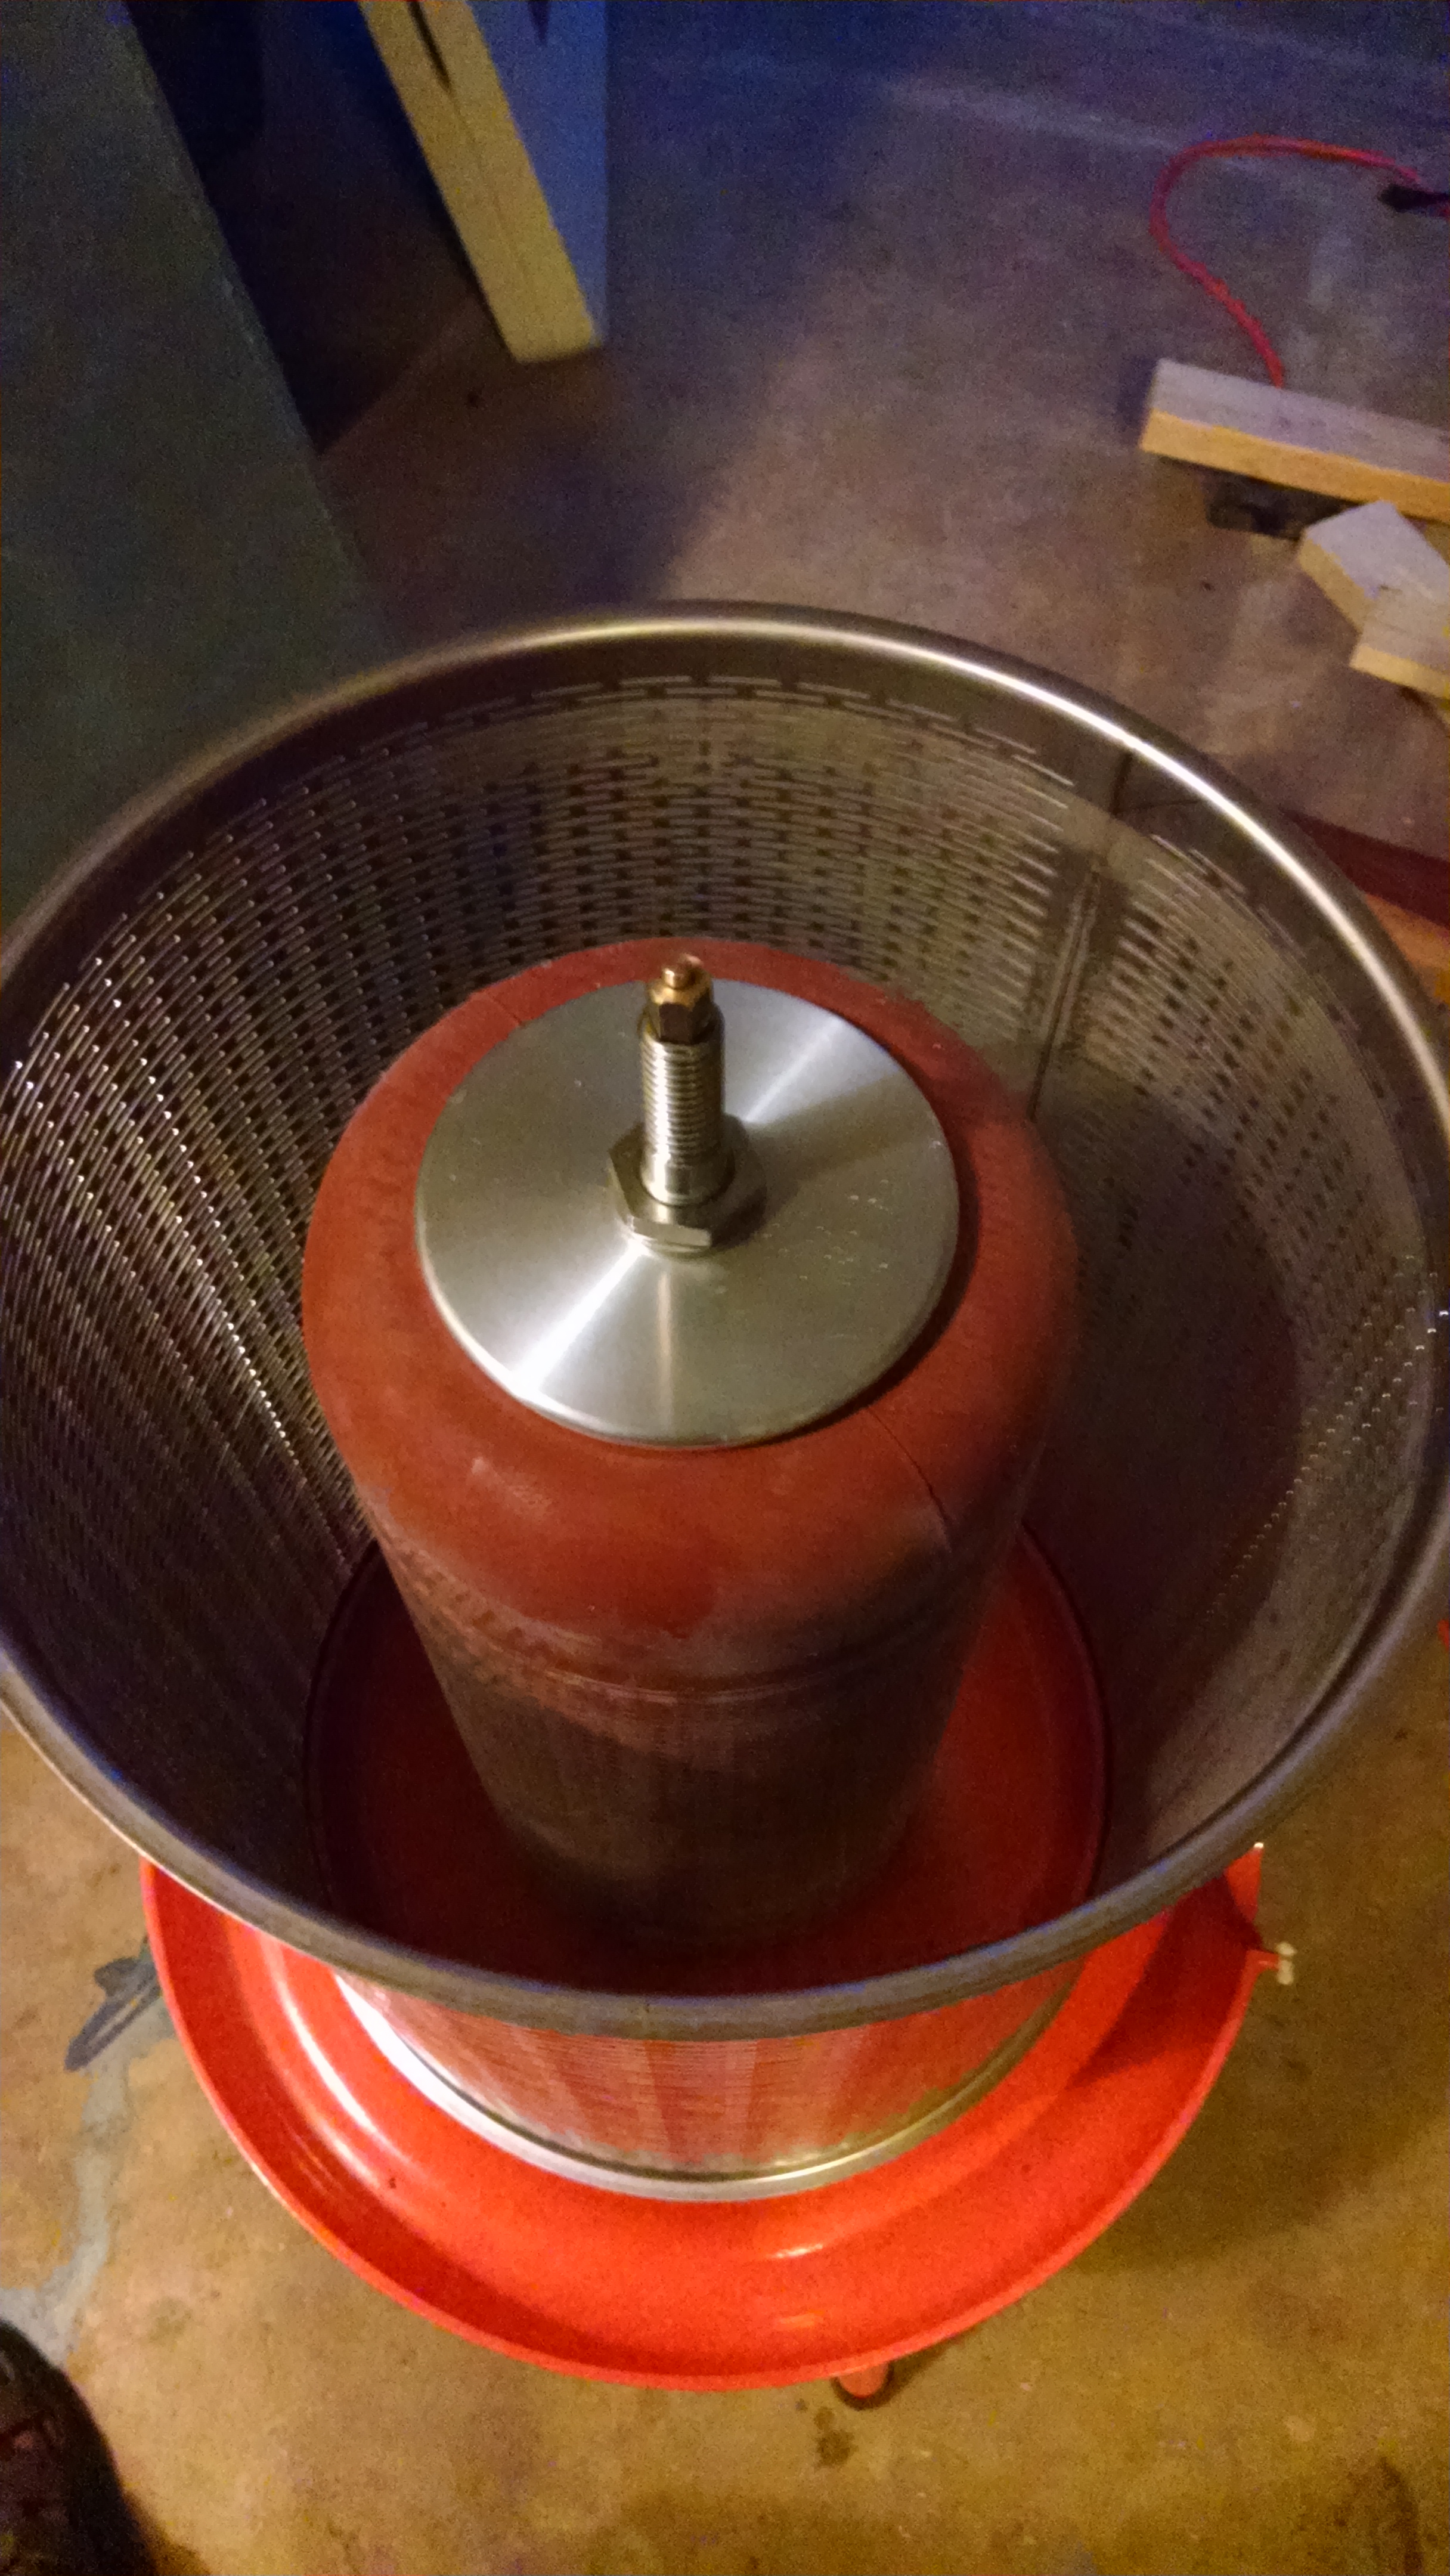
Inside the bladder press – the bladder at the center fills with water and expands to gently squeeze the grapes.
Well, not quite. It turns out the crushed grapes fall through the entire length of the bottom of the crusher, and need to be funneled into some kind of container, either a small fermenter or buckets to carry the grapes to a larger fermenter. So, I turned back to MoreWinemaking, which is where I bought the crusher to see about a stand. It cost $325, which isn’t terrible, but it would have cost nearly as much to ship it, since it has to go by truck. That just seemed wrong, somehow. I had paid one shipping cost for both the crusher and bladder press, and while the shipping was expensive, it was still only a fraction of the cost of the two pieces of equipment. In the case of the stand, I just couldn’t bring myself to pay as much for shipping as for the item itself.
So, I tried other vendors, and the story was the same everywhere, until I stumbled across Carolina Wine Supply. They were willing to ship it UPS or FedEx, unassembled in a flat box, for something like $25. Definitely a company I’ll be doing more business with.
For what it’s worth, having equipment shipped by truck isn’t exactly a trouble-free process. They really want to ship to businesses with loading docks, not to suburban homes, and the cost goes up significantly for the latter. Moreover, they expect you to make arrangements to be there when they arrive, which can be difficult because they don’t always provide much advance warning. I was able to bargain with the trucking company to leave the items on my driveway while I wasn’t home, which worked after a couple of false starts, but it did mean I waived my rights to inspect the items for damage. Well, you work with what you got.
At some point over the summer, I began to wonder where I would store the wine while it was fermenting and aging. Once the initial fermentation is complete, the wine goes into glass carboys for secondary fermentation and, later, for aging. I have quite a number of glass carboys, and it occurred to me that spreading them across the garage wasn’t practical.
A six gallon glass carboy is heavy to begin with, but once full, it weighs an additional 48 pounds, so moving a full carboy around is physically demanding and mentally harrowing. If it slips from your hands and breaks, you end up with a garage full of spilled wine and broken glass. Not good.
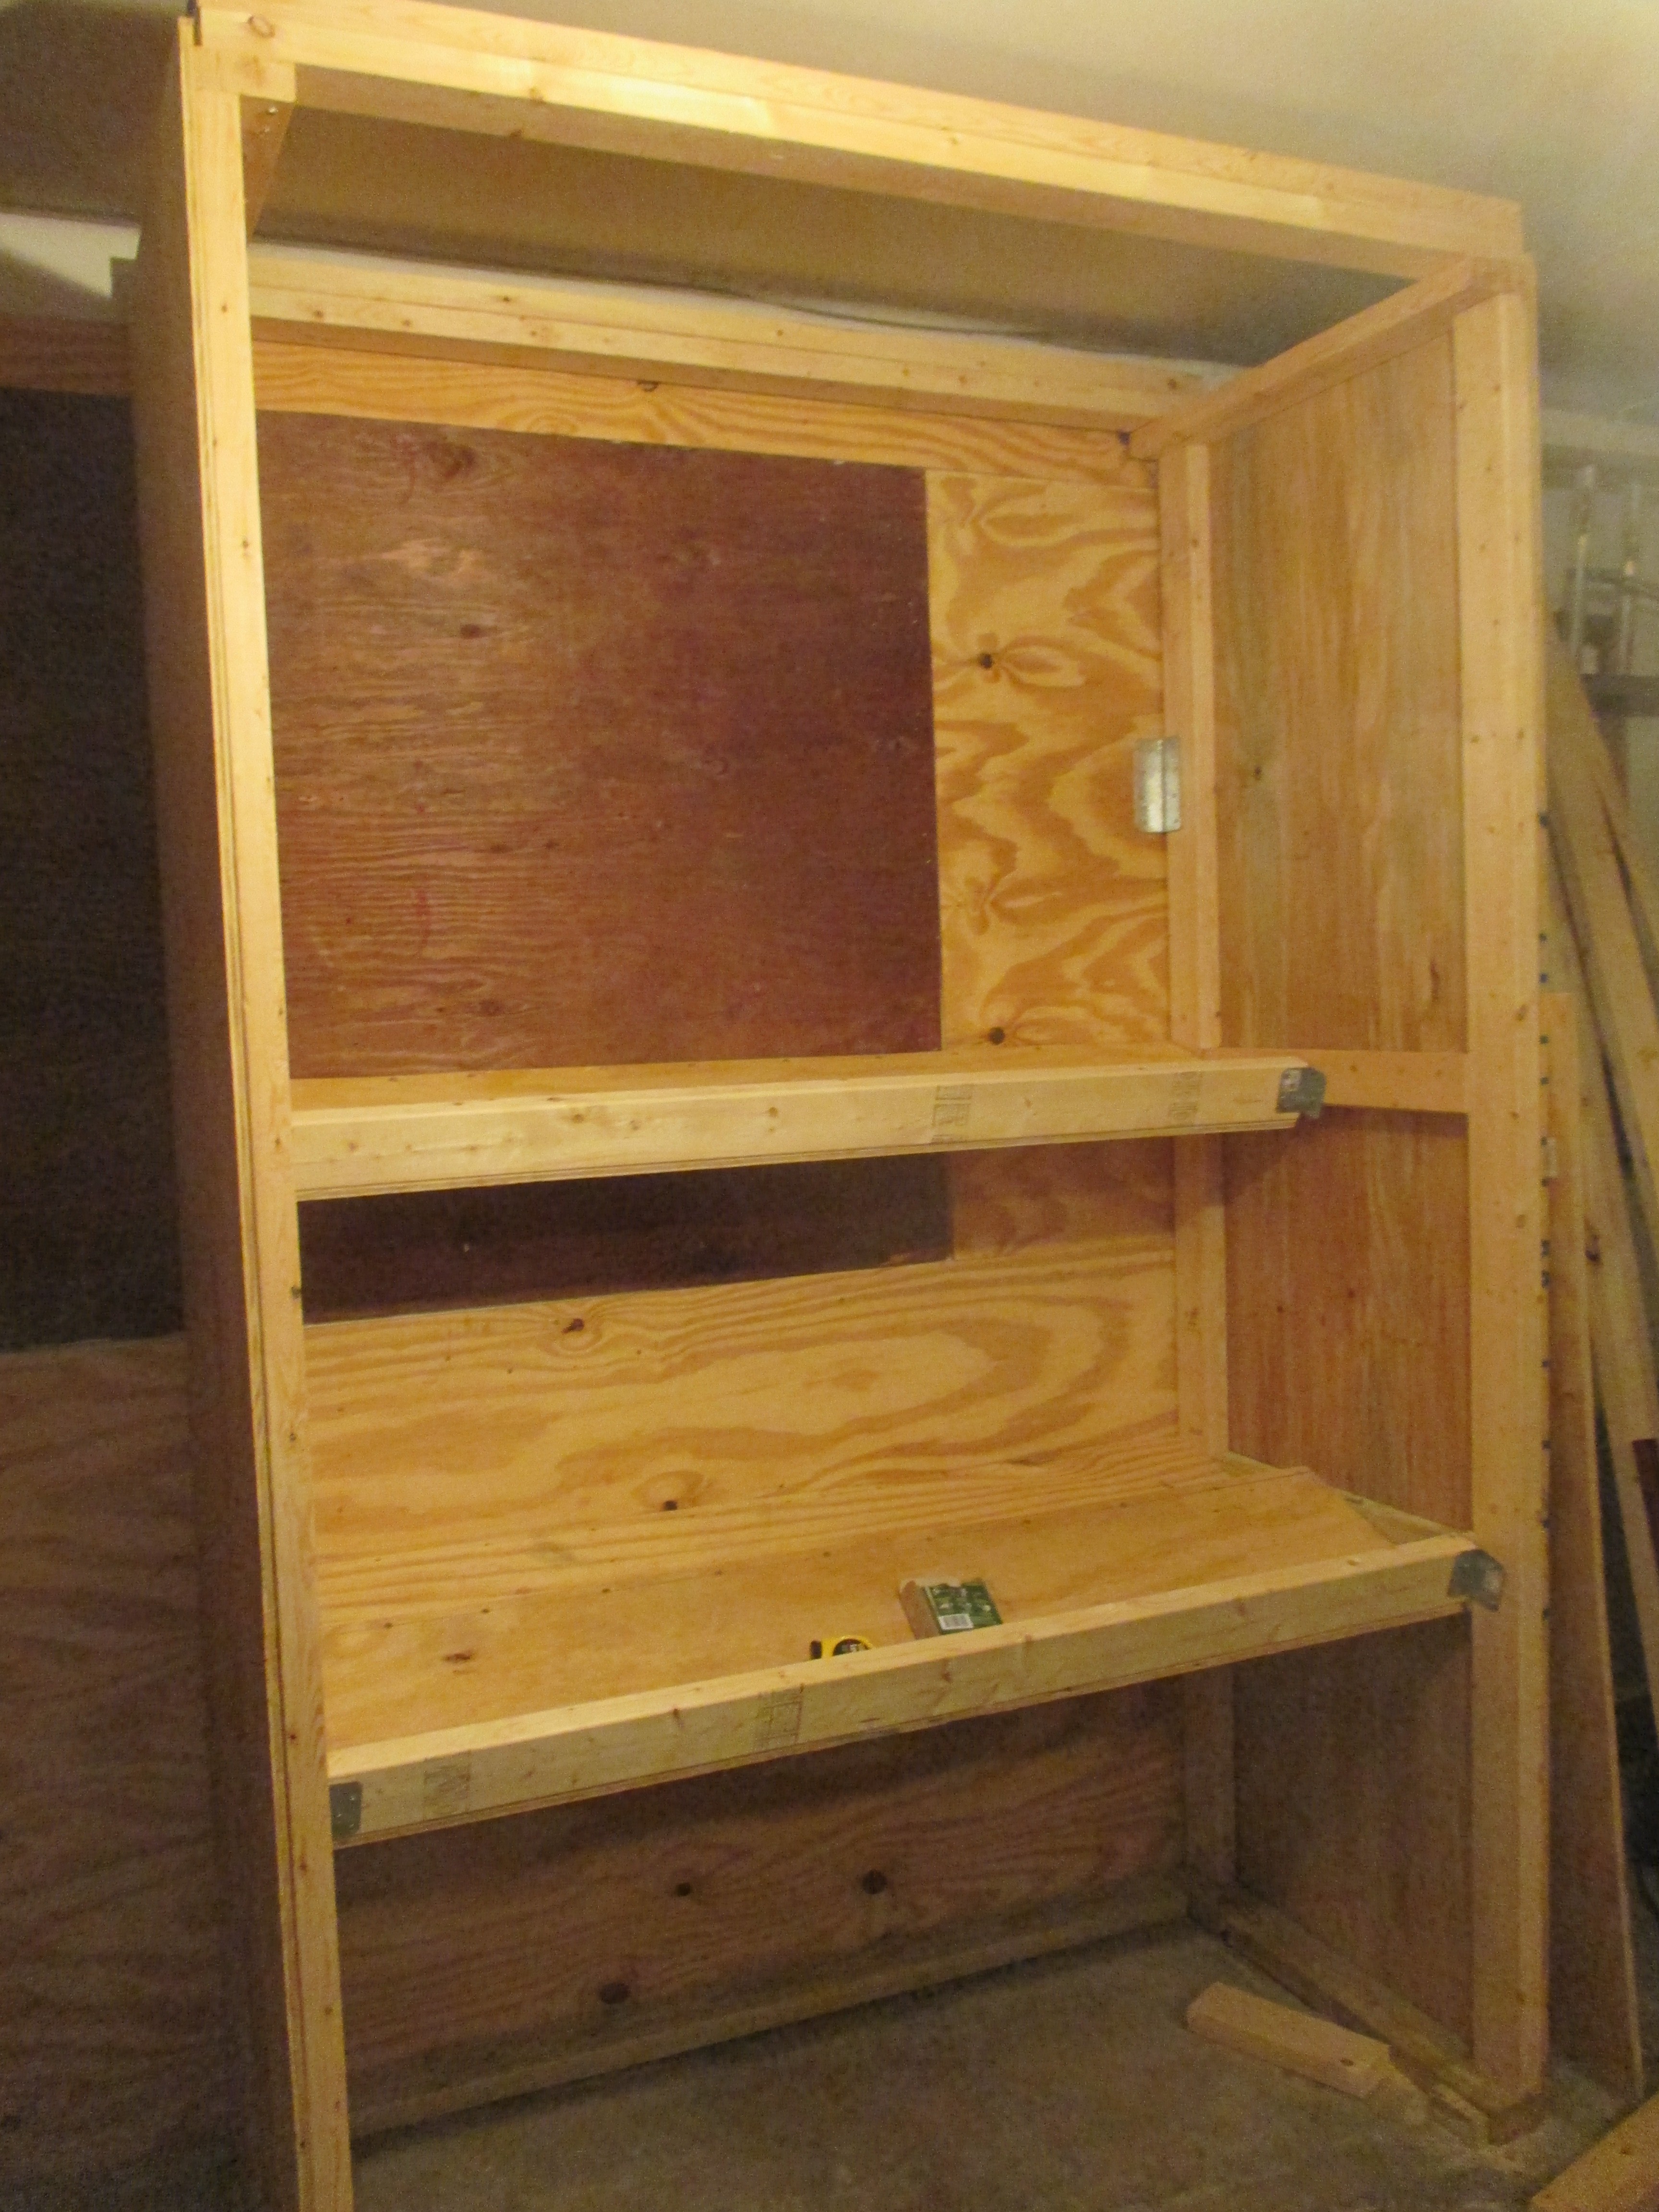
Still under construction, my garage “barrel room” will hold at least 15 six-gallon carboys of wine.
So, I’m constructing a garage “barrel room” that should be large enough to hold 15 six galloncarboys on three shelves, plus either large plastic fermenters, small oak barrels or more carboys on the floor. The shelves are installed at a 15 degree angle, which makes it easier to insert a wine thief or racking cane into the back shelf. By using a pump to move wine, I’ll never have to lift a full carboy.
The very top shelf will hold an assortment of one gallon jugs, supplies etc., and a 5,000 BTU air conditioner mounted near the top will keep it cool inside. I have most of the inside finished, but need to build the doors and mount the air conditioner.
I’m pretty pleased with the way this home “barrel room,” looks, and I have to credit Steve Hughes’ book,The Homebuilt Winery. The book includes the plans, but fair warning, the average person will probably want to spend some time studying and interpreting the plans. I’ve done a lot of home construction projects in my time, and I have a pretty complete workshop, but I still found some parts of these plant to be a chore to figure out. So, while I like the book a lot, I wish it had provided a bit more detail for some of the projects.
However, the idea for the barrel room was worth the cost of the book, and the plans were adequate to get me through the project. The book also gave me the inspiration to build a dolly to move the crusher-destemmer around, and there are a few other projects that I might eventually take on. For the really ambitious, he shows you how to build your own ratchet press and destemmer, and a dozen or so other things. All in all, it’s a book I’d recommend for the aspiring Garagista.
We’re hoping to harvest Viognier in just a few days, though with rain in sight, that may not happen. Hopefully the grapes have another week in them before they start to become over-ripe. I was thinking of picking last week, but the brix (sugar level) was at 21, a few points lower than I wanted. The decision on when to harvest is based on lots of things, including ripenesss and the weather forecast, and you don’t always get the perfect combination. Waiting can be stressful, and it was hard to resist picking those Viognier grapes last week. A friend at a nearby winery counseled me to wait and deal with the stress, adding, “don’t lose your nerve!”
Well, I haven’t. At least not yet!
Preparing for the Harvest
The harvest is here, or at least it’s close. Our Viognier grapes should be ready to harvest next week (I had thought a week ago we’d would have harvested yesterday), and the Merlot and Cab Franc won’t be far behind.
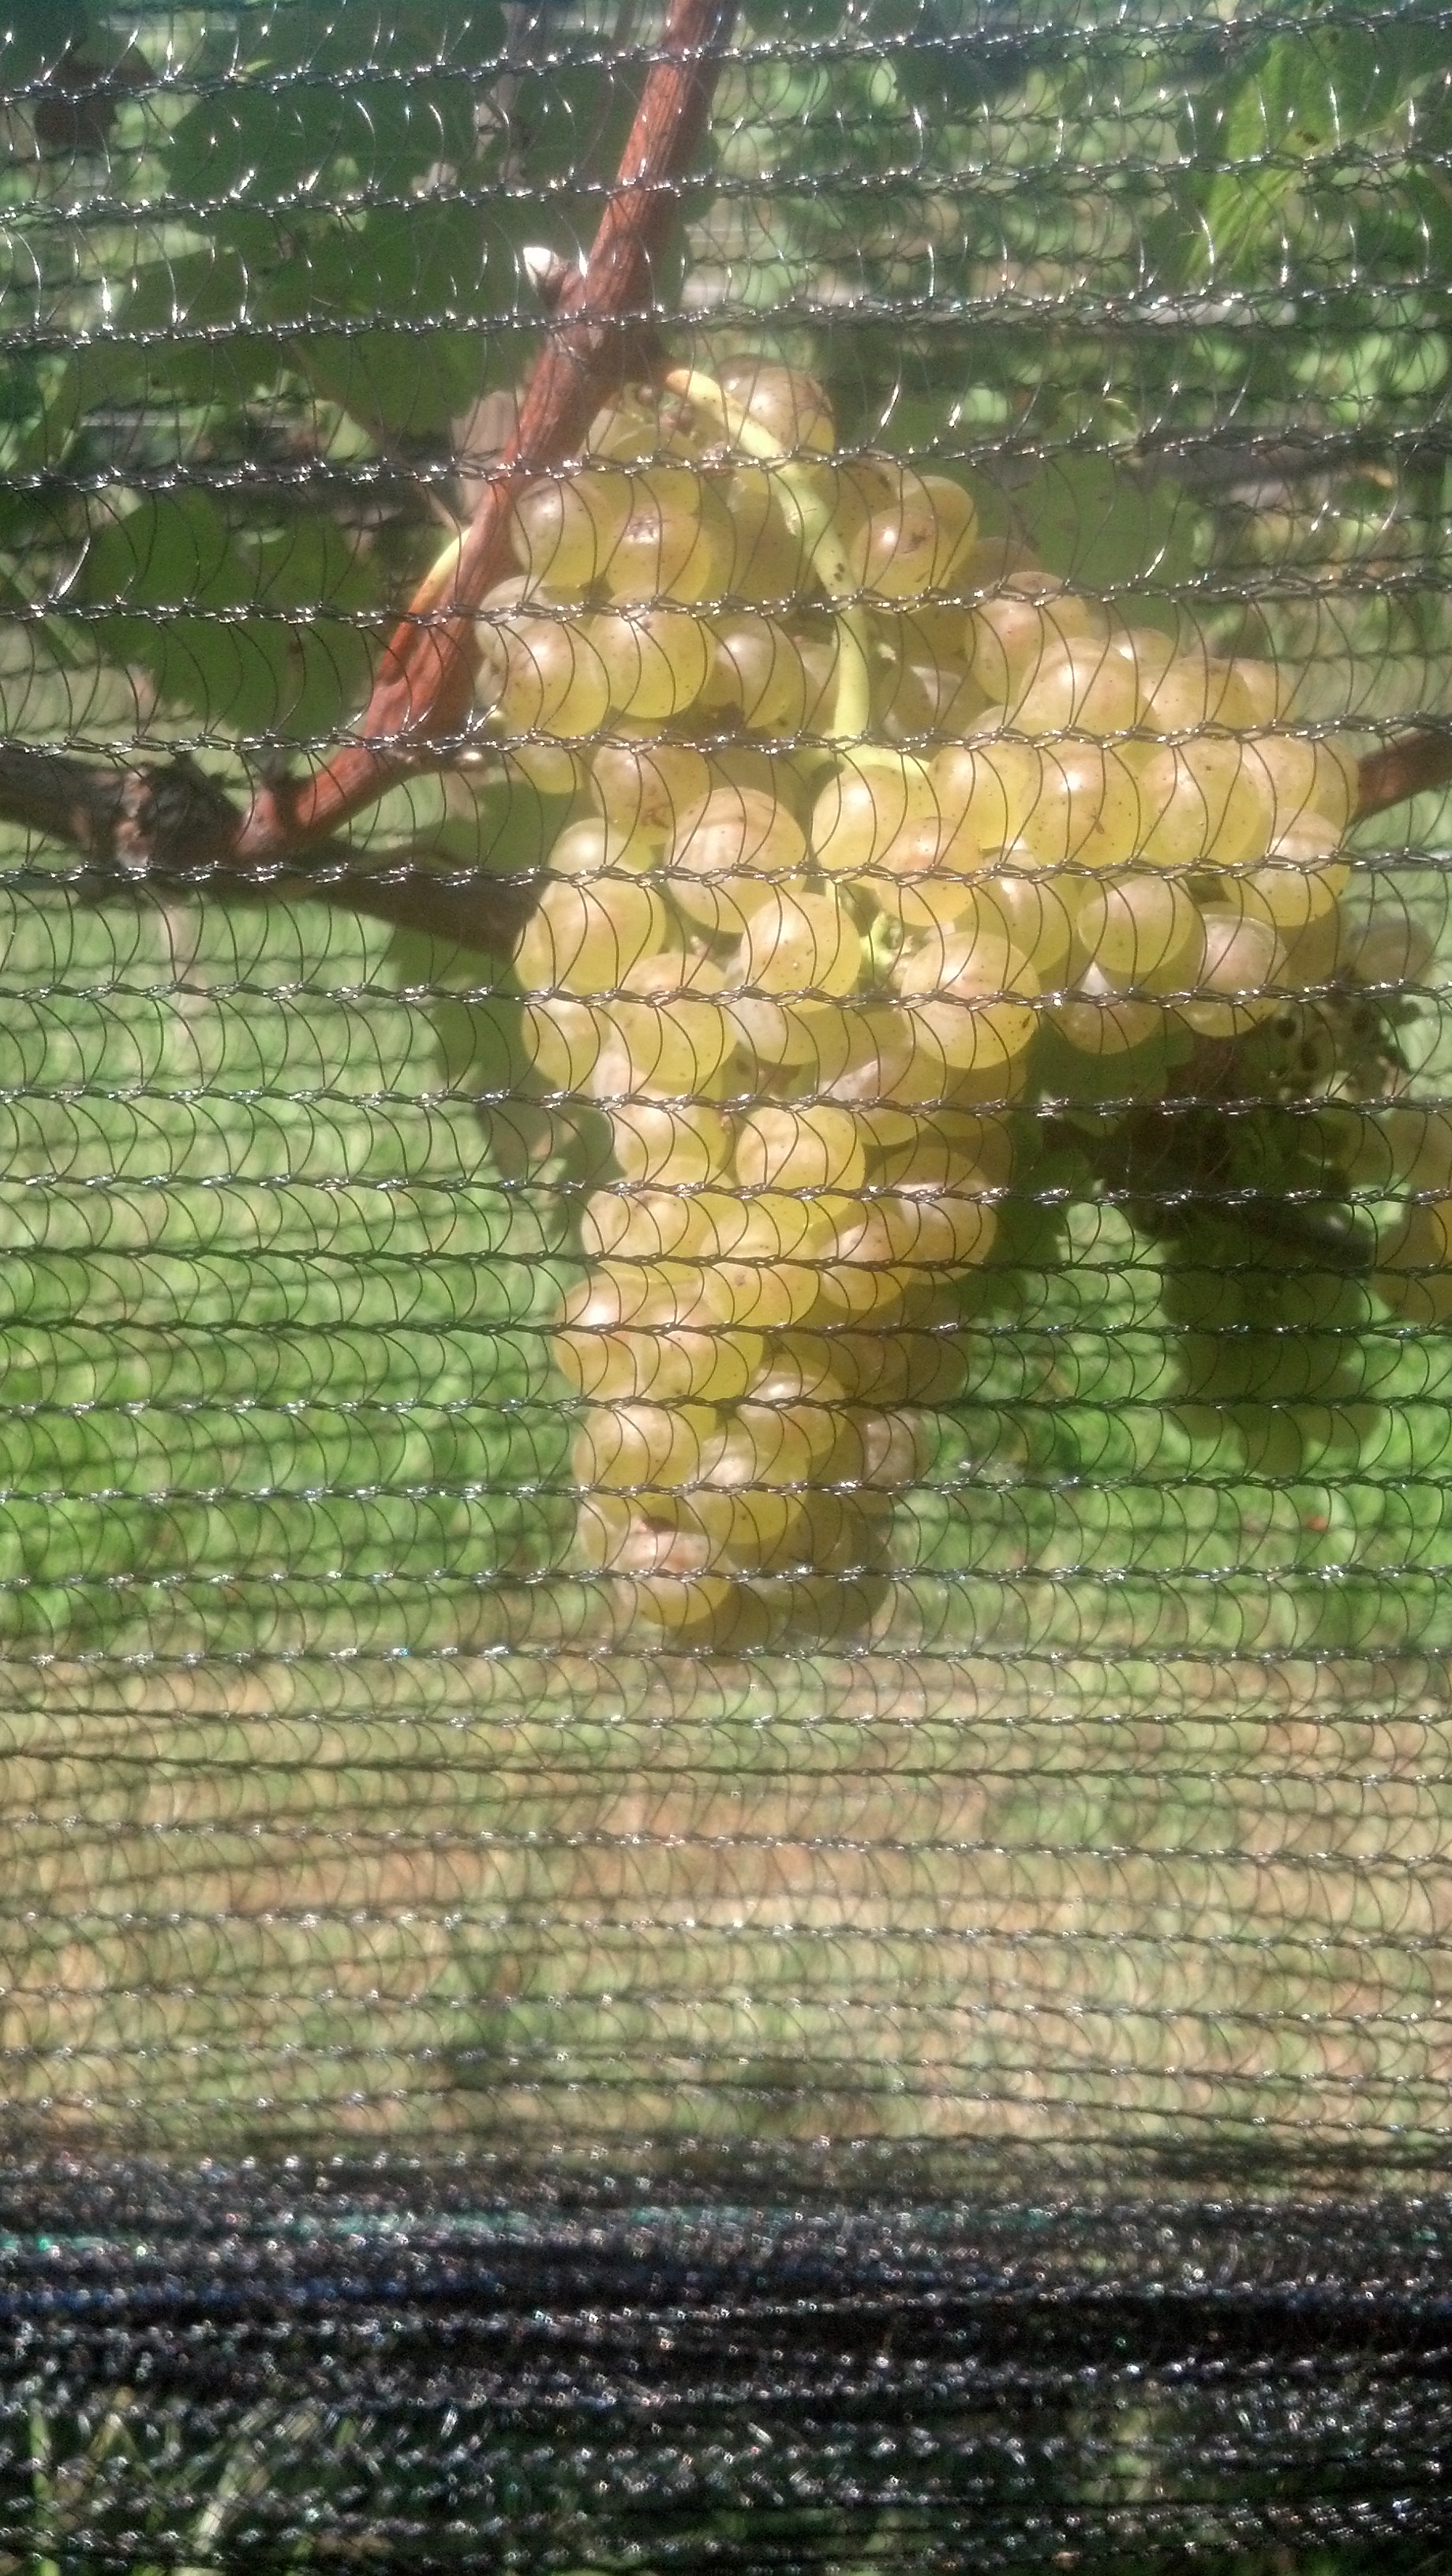
My Viognier at the end of August, partially obscured by bird netting, is looking fabulous
So, I’ve been scrambling over the past month or so to get ready. With a few notable exceptions involving John Updike, virtually all of my reading lately has involved winemaking. And the free time that I haven’t devoted to reading about wine chemistry or winemaking techniques have been spent assembling the equipment and supplies I need to make wine.
And it seems that I need a lot. I think the average cost of a bottle of wine from this vintage will approach the price of a bottle of Chateau d’Yquem. There’s a part of me that wonders if it wouldn’t have been smarter to have spent all that money buying someone else’s wine. But really, where’s the fun in that?
The learning curve has been pretty steep, and I’ve made a bunch of mistakes — even though I have yet to harvest my first grape. After learning all about free and bound SO2, pH, fining and a hundred other things, I realized I was all but clueless on a number of practical matters, such as which yeast to use for each grape variety. For hobbyists like me who are buying yeast in quantities of 50 to 80 grams at a time, the options are more limited than they are for commercial wineries that are turning out tens of thousands of cases of wine. But that’s a relative thing. There are still 40 or 50 different yeasts available in small quantities from companies like More Wine and Midwest Supplies.
I still remember a class at King Family Vineyards where winemaker Matthieu Finot invited us to taste wines from three different barrels. They were all distinctly different, and I was truly surprised when Matthieu told us that they were all made from the same grape variety from the same vineyard bloc and vintage, and that the only difference was the strain of yeast he had used. Clearly, yeast matters!
The Vineyard Goddess and I went to a lot of trouble to pick what we thought were exactly the right clones for each of the grapes we planted – and some of the clones we wanted were not easy to get – and the right root stock as well. So, it only made sense that we should go to the same lengths to get the right yeast. After lots of reading and lots of anxiety, I selected Rhone 4600 for my Viognier (and I think also for the Petit Manseng), Bordeaux Red (BDX) for the Petit Verdot, MT for the Merlot, and BM4x4 for the Cab Franc. And then, on reflection, I ordered something called BA 11 for the Viognier, even though I already had the Rhome 4600. Here’s the writeup on More Wine‘s web site for the BA 11:
BA11 was selected in 1997 near Estacao Vitivinicola de Barraida in Portugal. It has excellent fermentation kinetics, even at low temperatures. It promotes clean, aromatic, estery characteristics during fermentation. BA11 intensifies mouthfeel and augments lingering flavors in both still and sparkling white wines. BA11 encourages the fresh fruit aromas of orange blossom, pineapple and apricot. In relatively neutral white varieties BA11 brings out tropical fruit, cream, vanilla and spice. With fruit from hot climates, BA11 can really help to “flesh out” a wine by its’ volume and mouthfeel enhancement. This strain is good by itself, as well as being a great structural component to a blend. Best results from 50 to 77 degrees F, and alcohol tolerant to 16%.
Sounds pretty good, right? Well, for now. I’ll probably wait until I’m running the crusher before I settle on the yeast. Oh, and I still haven’t decided which yeast strain to use for the Petit Manseng. Maybe the Rhone 4600? Well, I was feeling pretty good about the future of my wine when I realized I hadn’t yet ordered malolactic bacteria, the stuff that converts tart malic acid to softer lactic acid, generally just in red wine. Not to worry. I went back to the More Wine site, did some research, and ordered enough ML bacteria to soften an ocean of malic acid. Well, maybe not an ocean. But at least the dozens or so (yes, I am an optimist) gallons of red wine I will be producing this year. It turns out that ML bacteria packages, once opened, can’t be saved. So for each of the three reds I’ll be making, I had to order separate batches of ML bacteria, at about $33 a pop.
I’ve ordered a half-dozen glass carboys and an array of other equipment.
And that’s barely scratching the surface of the purchases I’ve made in the past few months. I’ve accumulated lots of lab equipment, including an instrument that measures pH, sulfur dioxide, and titratable acidity. I bought a high-precision scale, an assortment of flasks, beakers, air-locks and stoppers, and four new plastic fermenters: two that can hold ten gallons of must and two that can hold 20 gallons. I already have a number of 7.9 and 6 gallon fermenters, so I’m feeling ready for a harvest of almost any size. And I’m really praying that I can actually fill at least one of the 20 gallon tanks.
There are also a few additives that are necessary, and some that are not, strictly speaking, necessary, but are helpful enough that I’ll probably try them out. In the can’t-do-without category are yeast foods. There are a few different ones available, both for mixing with the yeast when it’s being prepared for inoculation and for helping the fermentation along in the days that follow, but I settled on Go Ferm and Fermaid K.
Other additives include Tartaric Acid for making adjustments in the acidity of the must, Albumex Bentonite and other fining agents, and oak cubes, which substitute for the oak barrels that I don’t have. I could go on about additives, but I’ll stop here for now. In the next post, I’ll cover the big items, such as the crusher-destemmer and the construction of my garage “barrel room.” For now, though, I’ll close with a short list of the books and online publications I’ve found most useful.
First, I can’t say enough about the folks at MoreWine. In addition to all the stuff they’ll sell you — and they have a well-organized site that includes quality equipment and ingredients at reasonable prices with lots of information — they have a series of free booklets and guides that I would probably have been willing to pay for. The guides to red and white winemaking run nearly 100 pages each, and are full of practical information. In addition, they have guides to SO2, the use of inert gas, bench trials and a number of other subjects. After reading a bunch of other books, I found these manuals provided the down-to-earth practical information I needed to go from the vineyard to the bottle.
David Bird’s Understanding Wine Technology was also quite useful. It provides a good overview of almost every imaginable topic in winemaking, and gets into considerable detail. If you’re wondering how yeast works its magic or what carbonic maceration does, this is a great book. It isn’t the practical, down-to-earth kind of manual that MoreWinemaking provides, but it includes a wealth of information and it’s a joy to read.
David Pambianchi’s Techniques in Home Winemaking is probably the most detailed and thorough book on subjects of interest to home winemakers that I have ever encountered. This is a book that I have perused, rather than read, but I’ve used it to get loads of technical details on topics of interest. I’m thinking it’s a must-have for any home winemaker.
One of my favorite books on viticulture and winemaking is Authentic Wine by Jamie Goode and Sam Harrop. Split roughly in half between the two subjects, this book helped me understand what kind of winemaker I wanted to be. It covers lots of important subjects, like Brettanoymyces and free vs. bound SO2, but it also gets into some of the philosophical issues, like how much intervention in the cellar is okay.
The very first book I read, some four years ago, was Jim Law’s The Backyard Vintner. It doesn’t go into great depth on any subject, but it provides a more than adequate overview of all the important topics in viticulture and winemaking in very accessible prose. Jim Law owns Linden Vineyards, one of Virginia’s great wineries, and the articles on the Linden web site are also well worth reading. (And while you’re at it, check out Jim’s articles in the last two issues of Grape Press, the publication of the Virginia Vineyard Association, as well as an article in the next issue, which should be out by the end of September.)
And finally, the second book I read, just after Jim’s book, was Jeff Cox’s, From Vines to Wines. This is an excellent guide that covers everything from planting your vines to bottling the wine. If you’re not sure how to prune second year vines or how to rehydrate yeast, this book has everything you need.
There are many more books, I’m sure – I actually have a couple sitting on my shelf that I haven’t yet begun to read – on the subject of winemaking, but these should be enough to get anyone started. I wouldn’t say they’re a substitute for classes or hands-on experience, but they’re certainly an important supplement. God knows, I’ve found them invaluable.


Recent Comments